Pages

Monday, December 28, 2009

Christmas creations

Hi all,
I hope everyone has been having a safe and blessed Christmas. We had a very cruisy Christmas day - the rest of my crew were not feeling 100% (tummy bug) so I went to church in the morning and we just had a quiet day at home which was nice no rushing around the place. It was Charlotte's first Christmas and just had to share this pic of her ...


Also just thought I'd share some things I have made in the last week or two.


Cookie Gifts
Here are some homebaked biscuits I made with Sebastian as gifts for our neighbours, he was the official cutter outer-er.


The recipe was just for plain shape biscuits but we thought they looked a little too plain so we decorated them with white chocolate and some silver sprinkles, then wrapped them in some cellophane
and tied with a nice ribbon. We did try a couple just to make sure they tasted ok....and they did!


Quick Money Wallet
I gave a couple of people some money for Christmas this year (I know - not very imaginative) and didn't just want to put money in a card or envelope so I made up a couple of very quick money wallets.


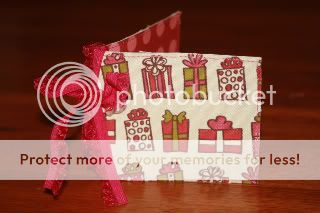
Here's a quick step by step:

1. Cut two strips of 3"x7" patterned paper. (For my outer layer I used a gorgeous love elsie self-adhesive fabric sheet)


2. Place paper back to back and sew around the outside, then fold in the middle.


3.
Tie some ribbon around the middle then add the money! All done.


Hope everyone is enjoying their time together - stay safe and well.


Tuesday, December 15, 2009

That time of the year.

What a busy time - school finishing, end of year functions, family get togethers...

With everything that is going on I hope everyone is keeping safe and well.

Just thought I'd quickly share the covered notebooks I made for my son Sebastian's Kindy teachers this year (yes he had 4!). They are really easy - I'd encourage anyone to give them a go.


Step 1. Choose a notebook of your liking.


Step 2. After choosing your papers, cut the background paper to the size of the notebook.
I also cut a 4x6 inch contrasting piece of paper - you could even use a photo instead of paper.


I lined up the holes of the notebook against the background paper and punched them out. If this seems a bit fiddly you can just cut the background paper short of the holes. To get the paper over the spiral binding I cut slits in the paper (see below).


Step 3. You can now embellish the papers as you like, do as much or as little as you like -
I machine sewed borders around the papers (sew before you attach to the notebook), added a button, stamped butterfly, strip journaled a poem and used Adornit tiny pink alphas to add a title.


Then attach to the notebook - I used doubled-sided tape (and glue for the spiral edge).

Step 4. Add a personal message to the inside cover.


The finished product.


Well I hope that is understandable - let me know if you want anything cleared up.


Enjoy and take care!


Sunday, December 6, 2009

My first post ...

Hi all! Welcome to my blog.

It has been a long time coming but I have finally made the leap into the blogging world.

I see this blog as being a place where I can share my crafty creations and a little part of my life too. (Hopefully) it will also be a place to encourage those that may be new or just starting out in papercrafting.

So enjoy the ride and feel free to come and say Hi!


Look forward to sharing some stuff soon.